NEW member - NEW Rossi R92 (56011) PICS Trouble in paradise

The Rossi Model R92, a lightweight carbine for Cowboy Action, hunting, or plinking! Includes Rossi manufactured Interarms, Navy Arms, and Puma trade names.
hutch
Posts: 23
Joined: 10 Mar 2013 23:31
Location: Ohio
Has thanked: 34 times
Been thanked: 13 times

NEW member - NEW Rossi R92 (56011) PICS Trouble in paradise

Post by hutch »

Hey Gang,

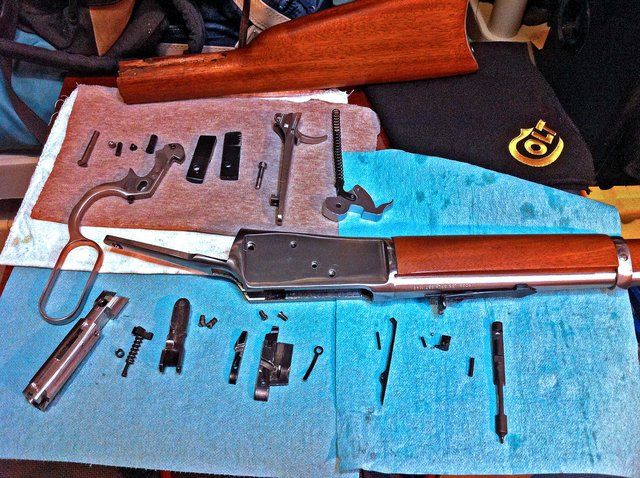
Brand new member here, having acquired my first Rossi this past Saturday! Not new to lever guns tho. Have a bunch of Marlin's. By the way, I have gotten really good at stripping this new Ross down - it's the EXACT steps to putting it back together that I am fumbling. It ain't just as easy as reversing the steps. I'm pretty handy but must have a mental block. Must be a reason no one does an ASSEMBLY piece, eh? I have done it now for the 3rd time and re-assembled differently all three times. :oops: My Rossi 92 is a little smoother now, but still has trouble cycling most ammo consistently. I'm a Marlin guy, but bought this beautiful Rossi and love the way it looks, but the blamed thing just doesn't work as it should! Couldn't find a Marlin 1894CSS, so I ran across this stainless R92 NIB at a gun show (nope can't return) and said I gotta have it. Seemed to strip down pretty easy, but it sure is a bear to get that bolt & lever back in place properly huh?

It's a 2013 Rossi R92 (56011), or so the serial number look up at Rossi USA says. I'm afraid I acted too quickly and this must be like Rossi's version of a Remlin or something. It sure is frustrating. So far I have 1) stripped her down to the bones & cleaned all the gunk out carefully. 2) seasoned the SS with an 2x eezox treatment 3) smoothed, polished and deburred everything I could find. 4) left the screws loose, tightened them, and everywhere in between. 4) trimmed the carrier pin spring so it wasn't so stiff (thinking that was why the carrier was't moving smoothly) I've tried everything I could find here. Not sure what else to do. At least it will cycle a few rounds now, but not well enough for it to be a real lever action rifle. I've fixed 2 Remlins to be sweet rifles. This one has me stumped & PO'ed. Here are a couple of pic's of how the case head hangs up on the front of the guides. The carrier is at full max height. Pic #1 = as jammed with bolt against round. Pic #2 = bolt backed away. These are 158 gr semi jacketed flat points 1.54 - 1.59 OAL. It does the same thing with factory jacketed FP, and Hornady Leverevolution does a little better, but occasionally I end up with one pointing straight up in the air. Now Winchester PDX jacketed hollow points measuring 1.57 seem to do OK (IF I don't tighten the carrier screws as much as I'd like. Speer Gold dot jacketed HP are ok. Likely any hard ball ammo would be OK too, so it's the Flat Points it can't digest, the main ammo intended for this rifle. DANG.

It seems if I put it back together with all the screws pretty loose, it cycles VERY smoothly, but still chokes on about every 3rd or 4th round. If I tighten down the screws so it seems as if they won't fall out in the field, it is noticeably "rougher" and the carrier doesn't move up and down as freely. In fact you have to jam it so hard on the forward/down stroke to get the carrier to rise to the right height, it just doesn't seem right. When it jams, it is nose up and not stuck under the aft part of the cartridge guides, but the head seems to hang up on the forward (closest to the barrel) end of the slot in the cartridge guide. If I loosen up the carriage screws, set the rifle between my legs (no comments please) and then push the lever down HARD, and pull it back equally as hard, I can cycle a full magazine. I kinda look funny shooting that way tho. I end up a sore thumb and sore index finger. I know, whine, whine, whine. Works about 75% if I have both carrier screws LOOSE, and I mean loose, and cycle really hard, concentrating on whamming that lever forward and coming back pretty hard. You can see what it's doing to the brass!! Even if I just barely tighten the carriage screws the action noticeably binds up and the carrier doesn't move up and down freely. I'm ready to get out the BIG hammer, chisels and files if necessary. This rifle isn't doing me any good like it is. And I want it fixed before I consider selling it and continuing my quest for a Marlin 1894CSS. If you guys can help me fix this lever gun, it sure will help restore my sanity. Well . . . at least put me back where I was before I bought this Rossi R92.

If it was a Marlin, I'd know what to do. HELP! Man - look how PURTY she is, but she just doesn't work. Hmmm - I resemble that remark.

Any idea's from the Rossi experts?

- hutch
IMG_1475.JPG
IMG_1476.JPG
IMG_1483.JPG
You do not have the required permissions to view the files attached to this post.
Xshot
Posts: 125
Joined: 18 Sep 2012 20:36
Location: Wisconsin
Has thanked: 3 times
Been thanked: 16 times

Re: NEW member - NEW Rossi R92 (56011) PICS Trouble in parad

Post by Xshot »

Here are some things to do:

1. Remove the left and right cartridge guides. Pay attention to the left guide and it feed stop spring.
Polish the cartridge grooves on both L & R guides.
Relieve the top of bottom relief cut, on the left guide, so the detent ball on cartridge lift transitions smoothly to the top relief cut.
2. Remove the cartridge lift. Note it has a spring loaded detent on the left side.
Remove detent and spring carefully (small parts)
Polish lift ramp smooth (the smoother the better)
Clean detent hole an remove 1 or 2 coils. Do it by testing the feel.
Polish the ball end of detent, then reassemble
3. Make sure there are no burrs on the bottom of the chamber mouth
I polished the bottom edge of the chamber mouth using Flitz and a dremel with a soft cone (low speed)

Made a world off difference on mine.
hutch
Posts: 23
Joined: 10 Mar 2013 23:31
Location: Ohio
Has thanked: 34 times
Been thanked: 13 times

Re: NEW member - NEW Rossi R92 (56011) PICS Trouble in parad

Post by hutch »

Xshot wrote:Here are some things to do:

1. Remove the left and right cartridge guides. Pay attention to the left guide and it feed stop spring.
Polish the cartridge grooves on both L & R guides.
Relieve the top of bottom relief cut, on the left guide, so the detent ball on cartridge lift transitions smoothly to the top relief cut.
2. Remove the cartridge lift. Note it has a spring loaded detent on the left side.
Remove detent and spring carefully (small parts)
Polish lift ramp smooth (the smoother the better)
Clean detent hole an remove 1 or 2 coils. Do it by testing the feel.
Polish the ball end of detent, then reassemble
3. Make sure there are no burrs on the bottom of the chamber mouth
I polished the bottom edge of the chamber mouth using Flitz and a dremel with a soft cone (low speed)

Made a world off difference on mine.
TX Xshot. I went ahead and did everything here I have it running pretty smoothly cycling most rounds that have no edge at the case mouth. Odd thing is it will only run right with the cartridge guide screws loose, and the carrier screws not all the way in. Darndest thing. By suggestion of a moderator, I've posted an updated version of this in the DYI gunsmithing forum here: http://www.rossi-rifleman.com/viewtopic.php?f=44&t=993

TX for your advice. Any idea why tightening the cartridge guide screws NARROWS the gap between the guides where a case can hardly get by? - hutch
User avatar
Ranch Dog
Site Admin
Site Admin
Posts: 9399
Joined: 23 Jan 2012 07:44
Location: Inez, TX
Has thanked: 1838 times
Been thanked: 2281 times

Re: NEW member - NEW Rossi R92 (56011) PICS Trouble in parad

Post by Ranch Dog »

hutch wrote:By suggestion of a moderator, I've posted an updated version of this in the DYI gunsmithing forum here: http://www.rossi-rifleman.com/viewtopic.php?f=44&t=993
hutch, don't see the post??? Just add the information to this post.
Michael
Image
hutch
Posts: 23
Joined: 10 Mar 2013 23:31
Location: Ohio
Has thanked: 34 times
Been thanked: 13 times

Re: NEW member - NEW Rossi R92 (56011) PICS Trouble in parad

Post by hutch »

Ranch Dog wrote:
hutch wrote:By suggestion of a moderator, I've posted an updated version of this in the DYI gunsmithing forum here: http://www.rossi-rifleman.com/viewtopic.php?f=44&t=993
hutch, don't see the post??? Just add the information to this post.
Hmmm - I posted it as a new topic,reviewed it, then cut & pasted that link to it. Now its gone. Here are the details more briefly. I'll re-upload the pics:

A couple of marathon sessions doing most of what I've read here. Including some pic's but not all needed I suspect. My goal is to resurrect this beauty and not pawn it off on some other poor unsuspecting coal. That just ain't right. Besides the original full strip, complete degreasing & eezox treatment, I tore her down a few more times, because it just wouldn't really cycle my dummy .357's made up from 158 gr semi jacketed FP in new REM brass @ 1.56-1.59 OAL. With factory brass it would cycle if I REALLY banged the cycle hard. Seemed the carrier was hanging AND round hitting at top of chamber. That was in previous post. It cycled fine out of the box, but had obvious "hitches". As an aside, I'm getting pretty adept at getting the bolt and lever back in correctly - learned how to use that third hand. HA!

Suffice to say after several more tear downs, and polishing everything I could find, shortening some springs, etc - I have her running VERY smoothly. She still doesn't like those dummies that cycle OK in my Marlins. Seems I'm a slow learner and FINALLY realized its the exposed leading edge of the case mouth that is the culprit. I can roll crimp those much better on my Lee Factory Roll Crimp dies. Just haven't had to roll 'em that tight in the past. She is doing really well with just about everything I throw at her except those, and will do so smooth & fast . . . IF I leave the cartridge guide rail screws and carrier screws loose. If I tighten those down, the carrier begins to bind and the carrier is further interfered with by the cartridge guides actually coming closer together. The dang round can barely get thru the guides from below. If I LOOSEN the guide screws, the part of the guides ahead of the head slot open up enough for the round to pass. Otherwise I have to really bang it on the forward cock and it does bugger up the cases. I loosen all the screws and she runs like my wife when I start talking about guns! Even cycles several brands of factory and reloaded .38 special OK. Any of you have that situation where tightening the guides made them move closer??

Seems wrong to run her that way, and I realize how impatient I'm being. For heavens sake she hasn't even been shot yet!! Lemme get a few hundred rounds thru her and see if it will loosen up. Ranch Dog suggested I tighten the up the screws a little, shoot the heck out of it and keep tightening as the rifle loosens up. When it runs right with live and practice rounds those screws are pretty loose. Seems like a no-brainer I know, but I'm just not used to going out and shooting a weapon that seems like it isn't working correctly.

I'm waiting on Steve's Gunz DVD and parts. I'll break her down again and do that stuff and get to shooting I guess. I must confess, I did grind a few 100th off the ears of the carrier, when I thought it was binding at the pivot point. I'm a little worried about that. And I 'relieved' a little of the transition to the detents for the carrier on the left cartridge guide. I've read here maybe I shouldn't have done so. I'd kinda like to replace the carrier and left cartridge guide, since that may be bubba'ed a little bit, but man does she fly with the right ammo! How can I get replacement parts for Rossi? Do I have to order them direct from Rossi? Having 'practiced' on the carrier & left guide I'm thinking it's time to reboot. I can try the aft lengthening technique on this one to see if it works on longer OAL, but will have brand new replacement pasts. How can I get some?

Thanks for all your help guys. - hutch
You do not have the required permissions to view the files attached to this post.
Xshot
Posts: 125
Joined: 18 Sep 2012 20:36
Location: Wisconsin
Has thanked: 3 times
Been thanked: 16 times

Re: NEW member - NEW Rossi R92 (56011) PICS Trouble in parad

Post by Xshot »

Hutch,

Check your PM's and give me a call.
User avatar
pricedo
2000 Shots
2000 Shots
Posts: 2509
Joined: 31 Jan 2012 10:36
Location: Dual Citizen (United States & Canada)
Has thanked: 56 times
Been thanked: 234 times

Re: NEW member - NEW Rossi R92 (56011) PICS Trouble in parad

Post by pricedo »

Image

Really nice layout of all the 92 parts. :mrgreen:
Thanks hutch.
Excellent visual aid to help the uninitiated organize & categorize all those little screws & other parts & make that FIRST TIME OUT a little less arduous. :D
LIFE MEMBER - NRA & GOA
User avatar
Ranch Dog
Site Admin
Site Admin
Posts: 9399
Joined: 23 Jan 2012 07:44
Location: Inez, TX
Has thanked: 1838 times
Been thanked: 2281 times

Re: NEW member - NEW Rossi R92 (56011) PICS Trouble in parad

Post by Ranch Dog »

hutch wrote:Ranch Dog suggested I tighten the up the screws a little, shoot the heck out of it and keep tightening as the rifle loosens up. When it runs right with live and practice rounds those screws are pretty loose. Seems like a no-brainer I know, but I'm just not used to going out and shooting a weapon that seems like it isn't working correctly.
I would have to agree with you. A lot of fellows will give the everything inside a good coat of oil and cycle the action about 500 times. Sounds like a lot but it really isn't. Have you done anything without ammo? My next suggestion would be to take a similar picture as the others but without the cartridge in the way. I would like to look at the fit of the carrier.

Oh, I'm now pretty sure I am responsible of the demise of your other post and I'm truly sorry about it. Posts within a few minutes of each other bearing the same topic title go into a bin on the admin side as a "double post". I saw both of them sitting there and approved the one with responses, this one, and deleted the other. Really sorry about that. :oops:
Michael
Image
hutch
Posts: 23
Joined: 10 Mar 2013 23:31
Location: Ohio
Has thanked: 34 times
Been thanked: 13 times

Re: NEW member - NEW Rossi R92 (56011) PICS Trouble in parad

Post by hutch »

Ranch Dog wrote:
hutch wrote:Ranch Dog suggested I tighten the up the screws a little, shoot the heck out of it and keep tightening as the rifle loosens up. When it runs right with live and practice rounds those screws are pretty loose. Seems like a no-brainer I know, but I'm just not used to going out and shooting a weapon that seems like it isn't working correctly.
I would have to agree with you. A lot of fellows will give the everything inside a good coat of oil and cycle the action about 500 times. Sounds like a lot but it really isn't. Have you done anything without ammo? My next suggestion would be to take a similar picture as the others but without the cartridge in the way. I would like to look at the fit of the carrier.

Oh, I'm now pretty sure I am responsible of the demise of your other post and I'm truly sorry about it. Posts within a few minutes of each other bearing the same topic title go into a bin on the admin side as a "double post". I saw both of them sitting there and approved the one with responses, this one, and deleted the other. Really sorry about that. :oops:
No prob on the post delete Ranch Dog. Figured I must have done something to delete it. This was more concise anyway. I'll get those pic's inside the receiver w/o a round in the way. I'll get one with the carrier down and one up soon as the light is right. Wondering about the gap between the guides & getting that right with the guide screws tight. From reading all your other stuff I understand you wanna have the gap so the case just barely passes on the upstroke. If I size a .357 case (rather than the new brass in my dummies) and use that as the measure, maybe I can carefully remove a couple thousands from the back of the left guide? Don't really want to mess with the inside where the bullet passes right?. I have no machine shop equip. Only a file, dremel and pretty steady hand. When removed I've noticed a tiny recess on the back of the guides where the threading starts and wondering if when I tighten down that guide screw its slightly bowing that guide? We are only taking a few thousands here, but enough that when they are tight, a case almost won't go thru the gap. Back off the screw and the gap is OK. Took me a while to notice that, thinking it was the carrier binding as it came up, when it was really the case being forced between the too tight guides. Seems a little "cheap" that tightening little screws would so change tolerances inside the receiver of a weapon huh? Unless they are tight, mu experience is they will loosen and soon be goooone. Or does that just happen to me? Also wondering if I should be worried enough about grinding on the ears of the carrier at the pivot to replace the carrier? It doesn't appear to have made it sloppy.

Waiting on Steve Youngs DVD/follower and ejector spring, but every time I tear her down I learn something else. So I'll do it later today and get you the inside receiver picks.

TX for your help Ranch Dog. I've accumulated all the necessary gear to begin casting soon as the weather breaks. Have read your Lee Casting notes over and over & have some new Lee dies. If its OK can I PM you with what I intend to start with. I know your a boolit expert and know all there is to know about Lee molds. Hate to impose, but wanna get off on the right start come warmer weather. Ideally like to start with boolits that work on both Rossi 92 and M1894, but looking like may not be possible due to bore size diff's. - hutch
User avatar
Ranch Dog
Site Admin
Site Admin
Posts: 9399
Joined: 23 Jan 2012 07:44
Location: Inez, TX
Has thanked: 1838 times
Been thanked: 2281 times

Re: NEW member - NEW Rossi R92 (56011) PICS Trouble in parad

Post by Ranch Dog »

hutch wrote:Wondering about the gap between the guides & getting that right with the guide screws tight. From reading all your other stuff I understand you wanna have the gap so the case just barely passes on the upstroke. If I size a .357 case (rather than the new brass in my dummies) and use that as the measure, maybe I can carefully remove a couple thousands from the back of the left guide? Don't really want to mess with the inside where the bullet passes right?. I have no machine shop equip. Only a file, dremel and pretty steady hand. When removed I've noticed a tiny recess on the back of the guides where the threading starts and wondering if when I tighten down that guide screw its slightly bowing that guide? We are only taking a few thousands here, but enough that when they are tight, a case almost won't go thru the gap. Back off the screw and the gap is OK. Took me a while to notice that, thinking it was the carrier binding as it came up, when it was really the case being forced between the too tight guides. Seems a little "cheap" that tightening little screws would so change tolerances inside the receiver of a weapon huh? Unless they are tight, mu experience is they will loosen and soon be goooone. Or does that just happen to me? Also wondering if I should be worried enough about grinding on the ears of the carrier at the pivot to replace the carrier? It doesn't appear to have made it sloppy.
It would be very important that there not be any burr or material on the back of the cartridge guides or in the slot in the receiver. Work with a small file would clean that up, I'm not a fan of the Dremel as I have not found one that files or dresses material flat.

Be very careful with the both the carrier and guides or they will need to be replace and equal a third of the cost of your rifle. With the carrier just make sure that the nose is not dragging on the inside of the receiver. With the stop spring action against the carrier from the left, there might be contact on the front left radius. Be very careful dressing or trimming the right side of the carrier or it will need to be replaced.
hutch wrote:TX for your help Ranch Dog. I've accumulated all the necessary gear to begin casting soon as the weather breaks. Have read your Lee Casting notes over and over & have some new Lee dies. If its OK can I PM you with what I intend to start with. I know your a boolit expert and know all there is to know about Lee molds. Hate to impose, but wanna get off on the right start come warmer weather. Ideally like to start with boolits that work on both Rossi 92 and M1894, but looking like may not be possible due to bore size diff's./quote]

You're welcome!

Feel free to post any of your questions about bullet casting directly into that forum. Better there than PM as everyone with the interest can add or learn from the topic.

I use the same bullet designs with both my Marlins and Rossi's, they just need different size and that is easy to work with.
Michael
Image
Post Reply