Trying to bring all the links I used into one thread for easy access...
Detail stripping the 1892 rifle:
0:00 / 4:54 Rossi M92,take apart and put back together in 4.30 minutes.
Detail strip and lube:
4:11 5:11 / 12:47 Rossi M92, 357 magnum.The application of a little lithium grease.
Fore Wood and magazine tube reassembly:
Cartridge Stop Fix:
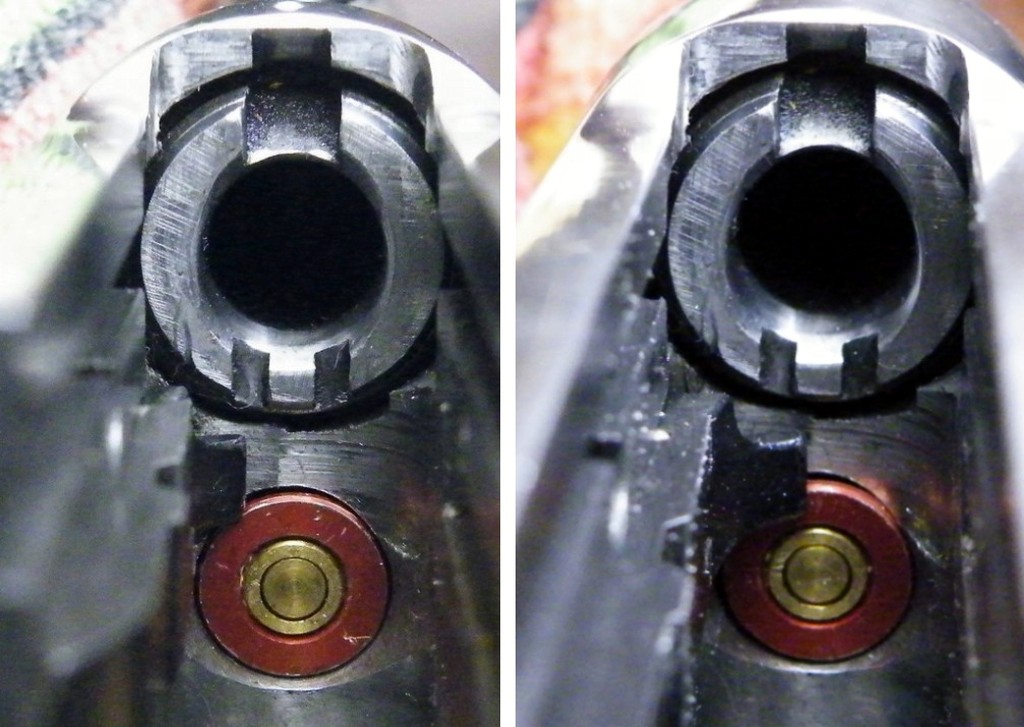
Braztech made rifles all seem to have this issue... most expecially the 357/38 Special calibers.
The cartridge stop does not rotate into the magazine path far enough to stop the next cartridge.
This is generally not a problem with 357 rounds, but shorter 38 special rounds tend to jam the lifter.
The fix is to remove the cartridge stop assembly and very carefully reshape the stop wedge on the back
of the carrier so that the stop finger can rotate further.
The cartridge stop is located inside the left side wall of the receiver and is attached with a single screw.
There is a leaf spring under the carrier that pushes the stop out into the magazine path.
Make sure to get that one back in place correctly.
See: Mute (m) 1:25 / 1:35 Rossi 92 .357 feeding problems Part 2
There is a very small wire gauge pin that holds the stop to the mount.
Look for the groove under the mount piece that will guide the punch (piano wire!) to remove the pin.
I had no luck reshaping the wedge with files and stone.
Finally did it with a Dremmel and cutting disk.
CUT very carefully and trial fit often!
0:07 / 18:29 Rossi M92 cartridge guide,loading gate and carrier removal.
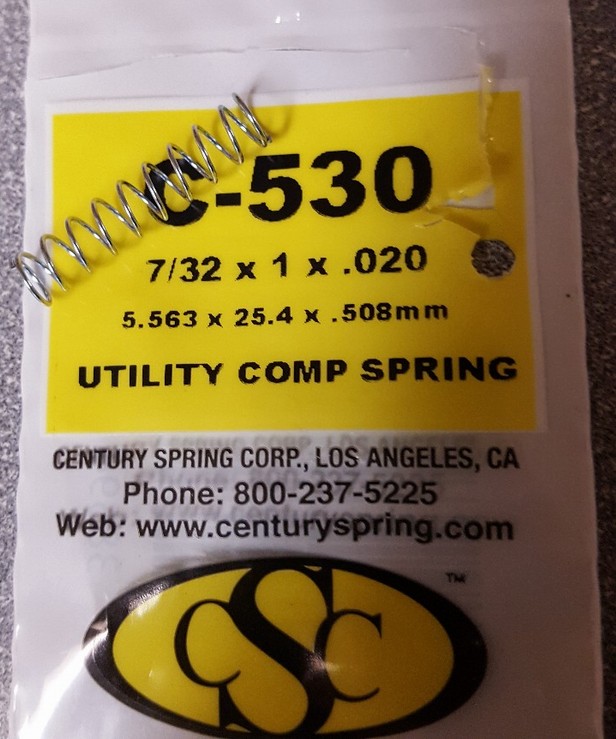
Ejector spring replacement:
I simply cut 1 (maybe 1-1/2?) coils off of the stock spring.
That made a huge difference in the ejector pattern, but it is a critical function.
A lighter replacement can be purchased so you don't bubba the only spring you have.
Metal removed is difficult to put back on!
Magazine Spring:
I clipped the magazine spring.
The idea is it should have 4 to 6 inches extending past the end of the magazine tube.
I'm sure that there are lots of other tips and how-to videos that are useful.
Feel free to add them to the list...
Richard
Rossi R92 Fluff 'n Buff
- cavelamb
- Posts: 66
- Joined: 23 Jan 2022 13:28
- Location: Heart of Texas
- Has thanked: 46 times
- Been thanked: 34 times
Re: Rossi R92 Fluff 'n Buff
Bump this one back to the top, since I'll be doing it again next week.
NRA Pistol Instructor, Metallic Cartridge Instructor, Range Safety Officer
-
- Posts: 10
- Joined: 02 Oct 2021 22:06
- Location: SW OH
- Has thanked: 6 times
- cavelamb
- Posts: 66
- Joined: 23 Jan 2022 13:28
- Location: Heart of Texas
- Has thanked: 46 times
- Been thanked: 34 times
Re: Rossi R92 Fluff 'n Buff
It's the little things that really add up.
Like changing out the plastic mag spring cap with a stainless steel one.
But then it's harder to see if the mag is empty.
Down in the shadows that steel cap doesn't really show up well.
So, while refinishing wifey's blonde R92 I powder coated the tip of the
stainless cap.
Kawasaki Green - a sample from the Powder Store.
That looks just like the original plastic cap!
The trick to making it easier to do is this ...
Using a hot air gun (or the wife's hair dryer???) WARM the part to about 110 degrees.
That's plenty warm enough to melt some powder onto the part just by pressing it into the powder.
Then bake - 400 degrees F for 10 minutes.
Good stuff, Maynard!
NRA Pistol Instructor, Metallic Cartridge Instructor, Range Safety Officer
- GasGuzzler
- Moderator
- Posts: 2751
- Joined: 02 Nov 2015 19:54
- Location: Cooke County, TX
- Has thanked: 310 times
- Been thanked: 451 times
Re: Rossi R92 Fluff 'n Buff
I put a brass follower in my .454.
__________________________________________________________________________________________
I've always been crazy but it's kept me from going insane.
- cavelamb
- Posts: 66
- Joined: 23 Jan 2022 13:28
- Location: Heart of Texas
- Has thanked: 46 times
- Been thanked: 34 times
Re: Rossi R92 Fluff 'n Buff
Well, I'm trying to make it NOT look like brass.
NRA Pistol Instructor, Metallic Cartridge Instructor, Range Safety Officer
- GasGuzzler
- Moderator
- Posts: 2751
- Joined: 02 Nov 2015 19:54
- Location: Cooke County, TX
- Has thanked: 310 times
- Been thanked: 451 times
Re: Rossi R92 Fluff 'n Buff
It did not look like a cartridge in the least.
__________________________________________________________________________________________
I've always been crazy but it's kept me from going insane.
- cavelamb
- Posts: 66
- Joined: 23 Jan 2022 13:28
- Location: Heart of Texas
- Has thanked: 46 times
- Been thanked: 34 times
Re: Rossi R92 Fluff 'n Buff
Hand rubbed oil finish
NRA Pistol Instructor, Metallic Cartridge Instructor, Range Safety Officer